

- Go to the ‘Workflows’ tab.
- Click on the ‘Add Workflow’ button
- • You will now see the ‘Workflow Form’ as shown in the image below:
- There are three sections to complete the Workflow Creation.
- Basic Settings Page
- Measurement Page
- Additional Input Page
- There are three sections to complete the Workflow Creation.

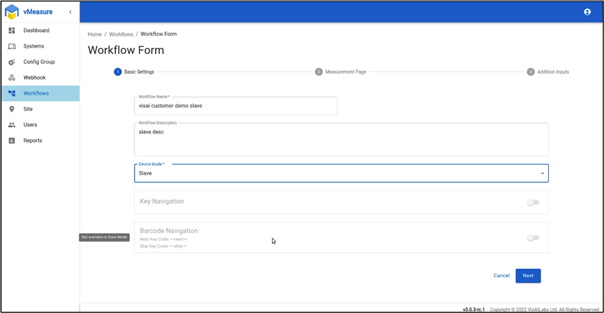
- Input the required details in the ‘Basic Settings’ Page
- Ensure you enable the ‘Master’ in the Device Mode field.
- You can configure the Navigation keys for the ‘Next Key’ and the ‘Skip Key’ using any of the following keyboard inputs: Enter, Tab, Page Up, Page Down, and Esc. Enable the ‘Key Navigation’ button to use this feature.
- You can also navigate between screens using the barcode. Enable the ‘Barcode Navigation’ button. Then, generate barcodes for the Next Key and Skip Key to perform this function.
- Click on the ‘Next’ button
- Enter the required details in the ‘Measurement’ Page with the instructions given below:
| S.No | Field Name | Description |
|---|---|---|
| 1 | Barcode Field | Configure the barcode settings |
| 1.1 | Barcode Field Name | Input the barcode field name as required |
| 1.2 | Barcode Minimum Length | The minimum length of the barcode to input |
| 1.3 | Barcode Maximum Length | The maximum length of the barcode to input |
| 2 | Measurement Trigger | Choose the Measurement Trigger |
| 2.1 | Delay After Trigger | The time delay between the barcode scan and measurement |
| 3 | Volumetric Weight | This section contains the Volumetric Weight configurations |
| 3.1 | Volumetric Divisor | This is a read-only field that displays a volumetric divisor set. |
| 3.2 | Show Volumetric Result | Option to turn on or off volumetric weight calculation |
| 4 | Image Annotation | This section contains image annotation configurations |
| 4.1 | Date/Time | Option to turn on or off data and time annotation on the image |
| 4.2 | Volumetric Weight | Option to turn on or off Volumetric Weight annotation on the image |
| 4.3 | Barcode ID | Option to turn on or off Barcode ID annotation on the image |
| 5 | Custom Field | This section allows adding custom fields on the measurement page. |
| 5.1 | Check this box to retain the data on the custom field added after measurement. | |
| 6 | Measurement Result | This section contains measurement result configuration |
| 6.1 | Enable Result Timeout | Enables timeout to auto-clear the measurement data |
| 6.2 | Show Result Barcode | Display the measurement data as a QR code |
- Click on the ‘Next’ button to proceed to the final step of the Workflow creation process.
- In the additional inputs page, you can add even more pages between the barcode and the measurement screen to collect additional information.
- You can do so by creating any one of the following field types:
- Text Box
- Check Box
- Radio Button
- Click on the ‘Save’ button to finish the workflow creation in the Master Mode.
- View the created workflows under Home / Workflows