
- 1. Introduction
- Getting started with vMeasure Forge
- Creation of workflows, webhooks, file hooks, and config groups
- 4. Getting started with Forge APIs
- 5. Reports Management
- 6. Support
1. Introduction
1.1 – The purpose of this guide
1.2 – How to use this guide?
1.3 – Pre-requisites
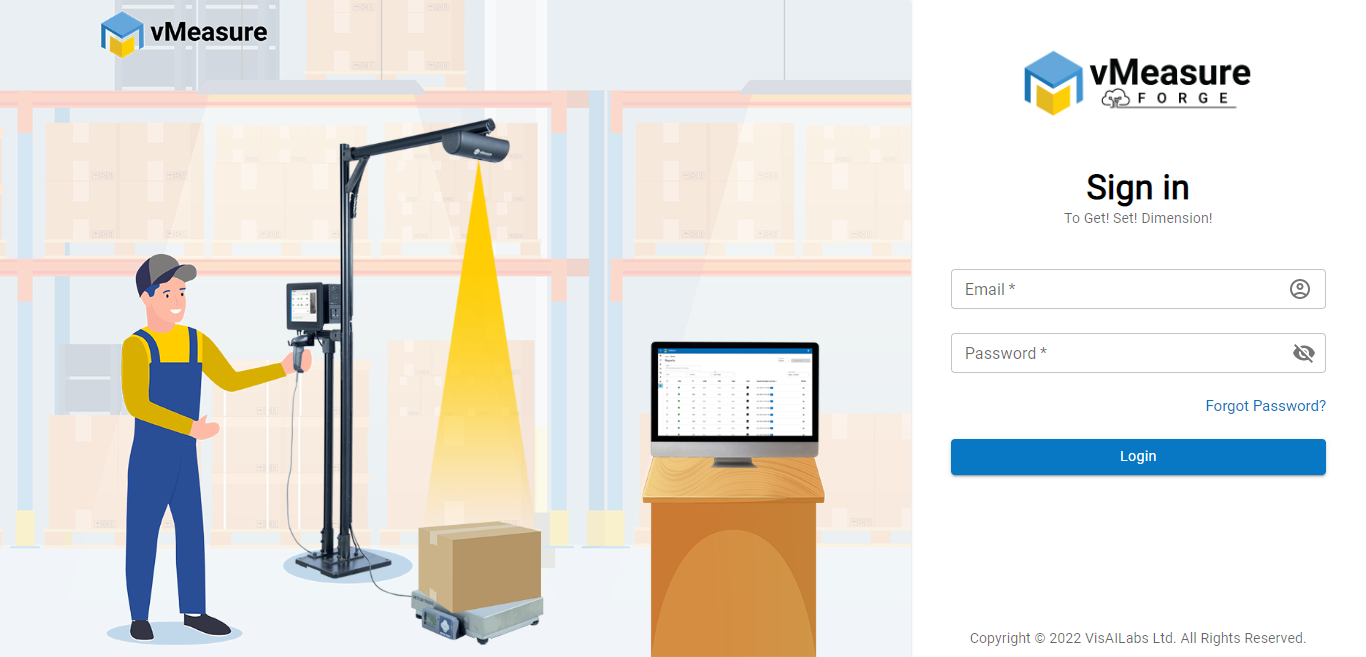
URL: https://forge.vmeasure.ai/
Ports: 8000, 6600, 8003, 8050
Getting started with vMeasure Forge
2.1 – Resetting Password
Step 1: You will receive an automated mail from noreply@visailabs.com for resetting the password. Please check the junk folder if it does not pop up in your inbox.
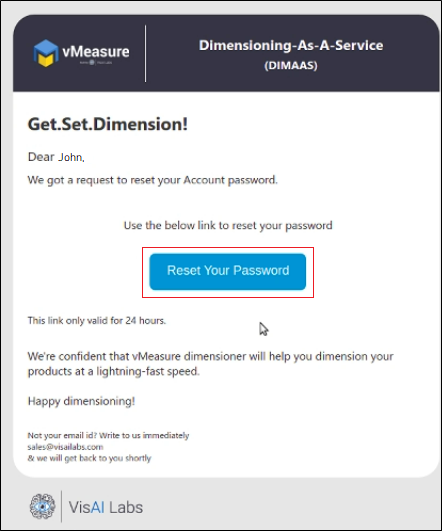
Step 2: Click on the ‘Reset Password’ button.
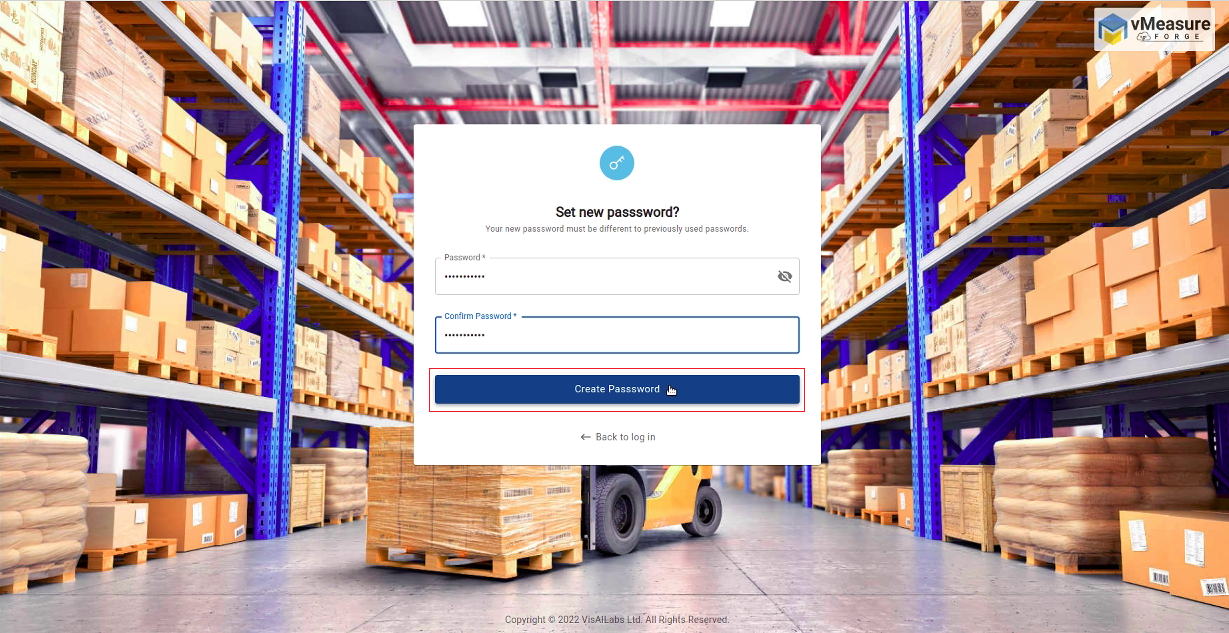
Step 3: This will take you to the ‘Set New Password?’ web page where you can create your password. Click on the ‘Create Password’ button to proceed.
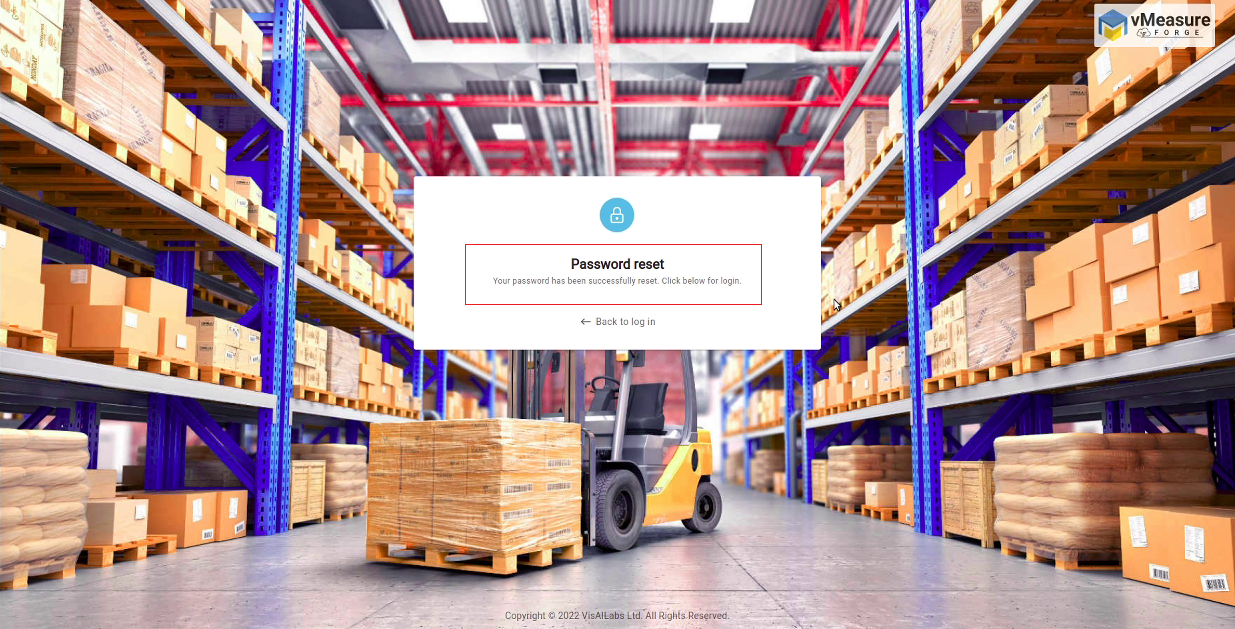
Step 4: The password reset is now successful. Navigate to the Login Page to enter vMeasure Forge using the new password.
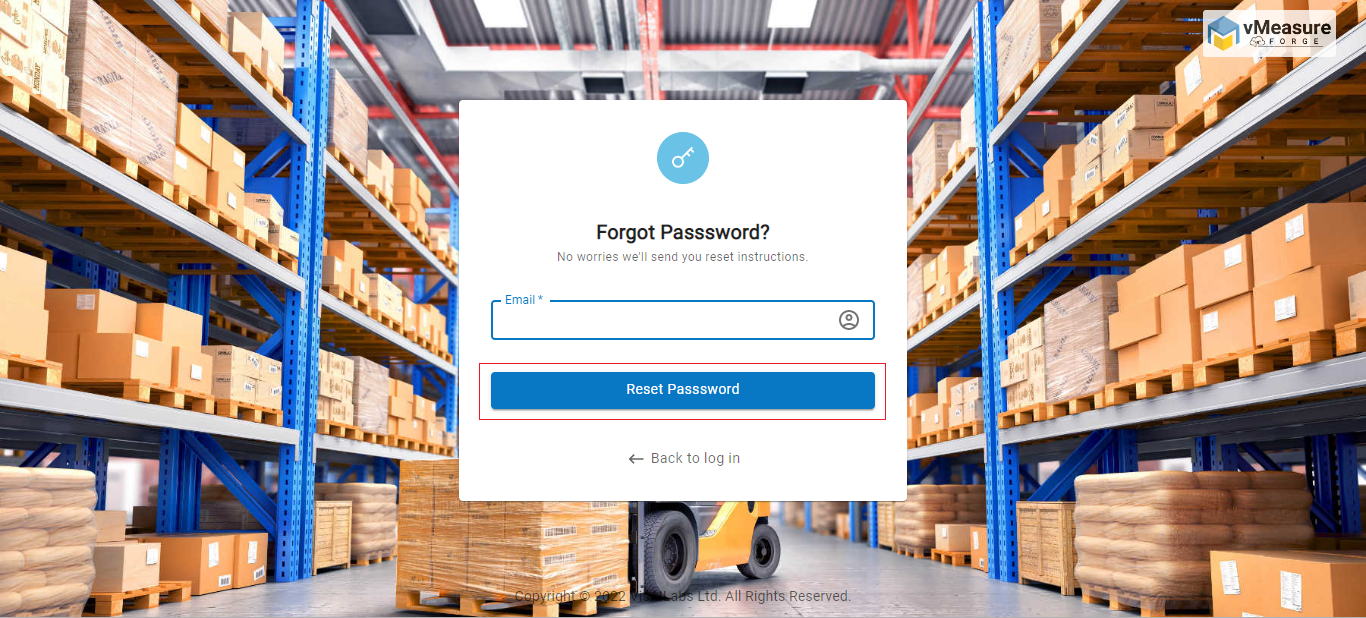
2.1.1 – Forget Password
If the ‘Reset Password’ link expires, then you would have to create a new password (if you are logging in for the first time) or set a new password (if you have forgotten the old one)

Step 1: Navigate to the ‘Login Page’ and click on the ‘Forgot Password’ button.

Step 2: Enter your email ID and click on the ‘Reset Password’ button.
Step 3: Repeat the steps provided in section 2.1 – Resetting Password.
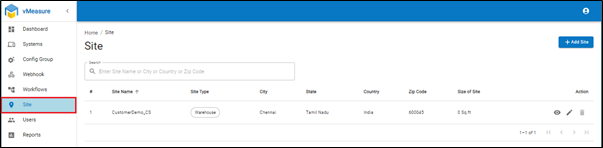
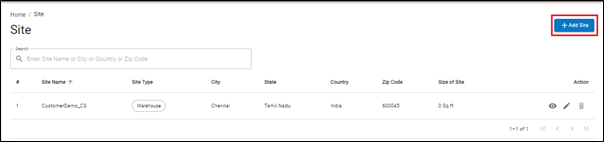
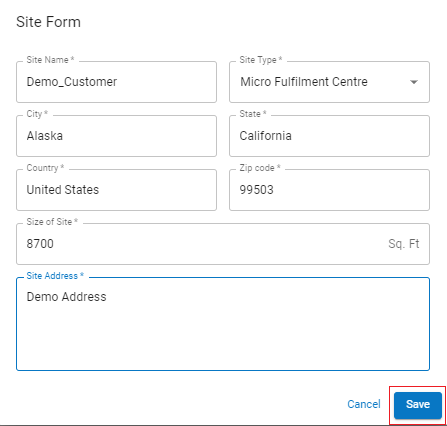
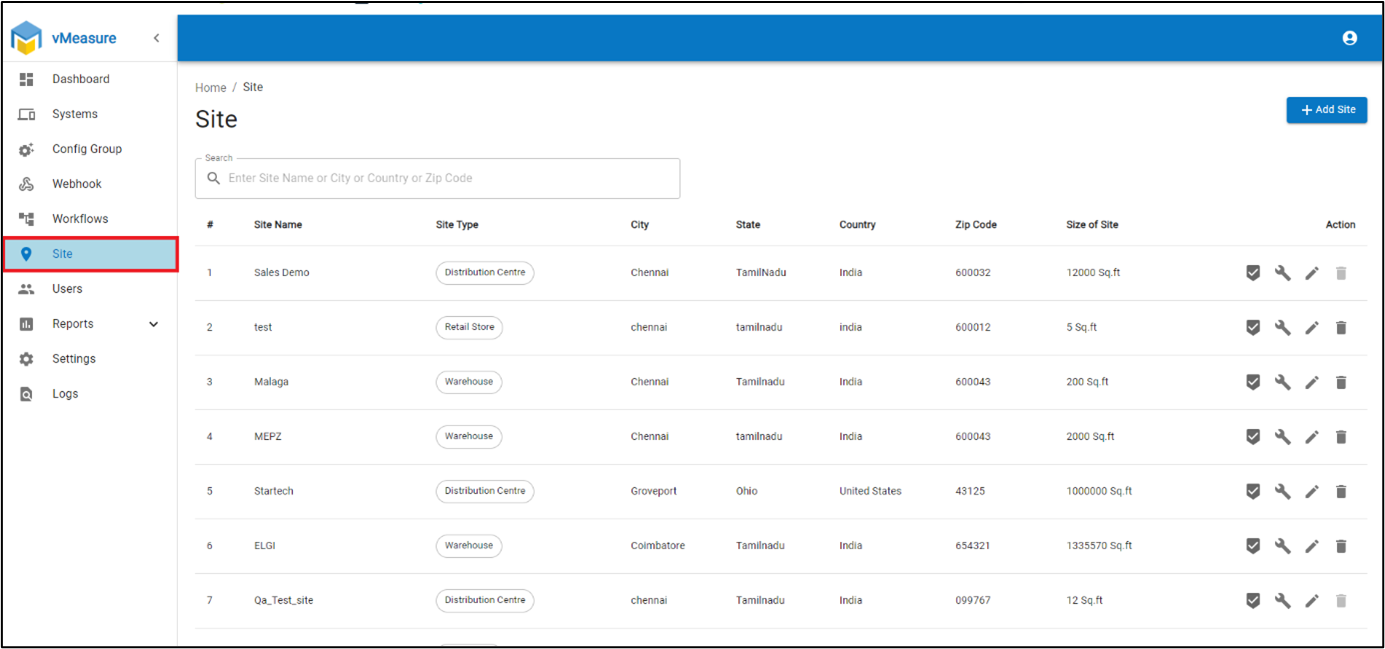
2.2 – Site Creation
Step 2: Navigate to the ‘Site’ tab on the left corner of the screen as shown in the image below:
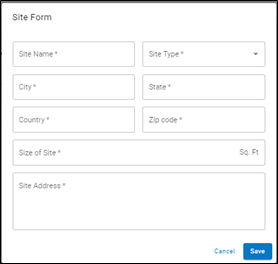
Step 4a: Select the ‘Site Type’ from the dropdown.
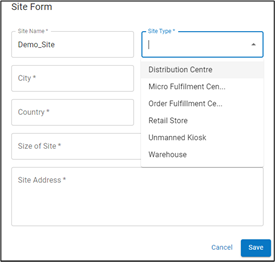
Step 5: Click ‘Save’ after completion.
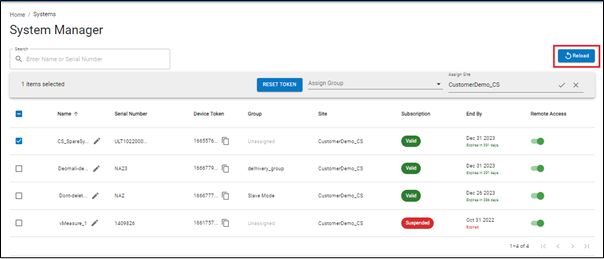
2.3 Assign site to a system
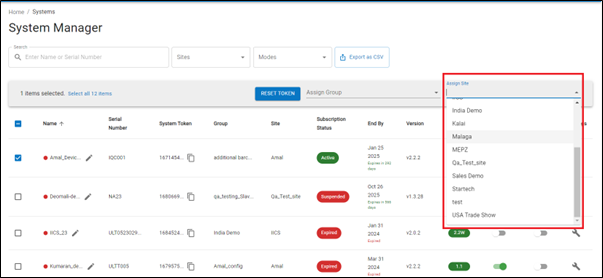
Step 1: Click on the ‘Systems’ tab on the left corner of the screen.
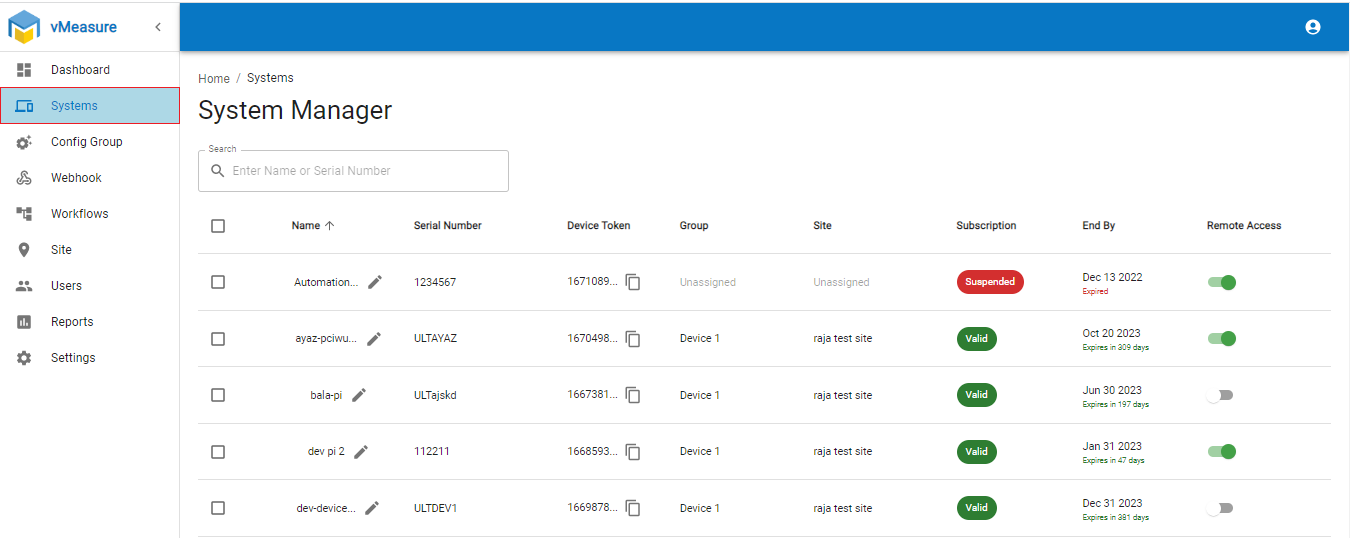
Step 3: Click the ‘Assign Site’ dropdown on the right corner of the screen. Choose the site from the dropdown.
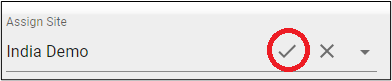
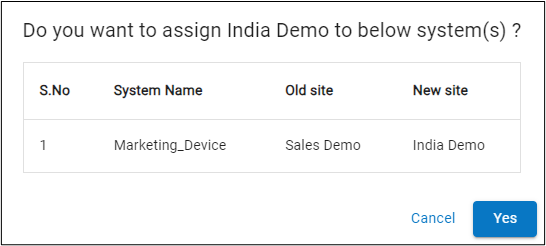
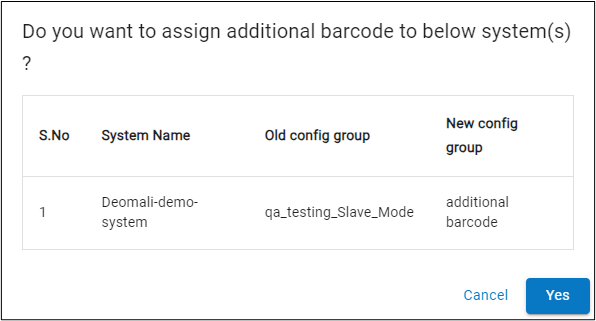
Step 5: A Confirmation pop up appears displaying old site and new site. Click ‘Yes’ to confirm your selection.
Step 6: Once Clicked ‘Yes’, you have successfully updated the site.
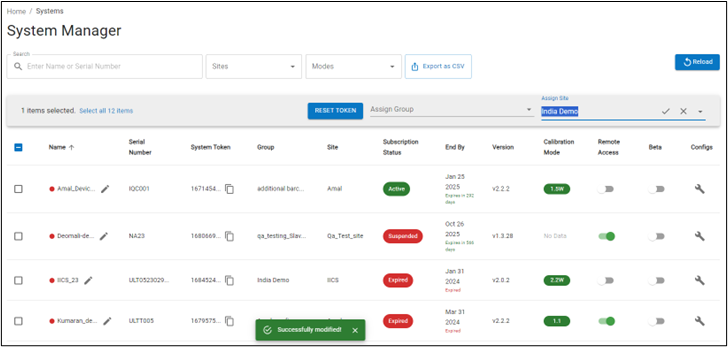
Step 7: After selecting the site, click the Reload button above the ‘Assign Site’ button for the assignment to take effect.
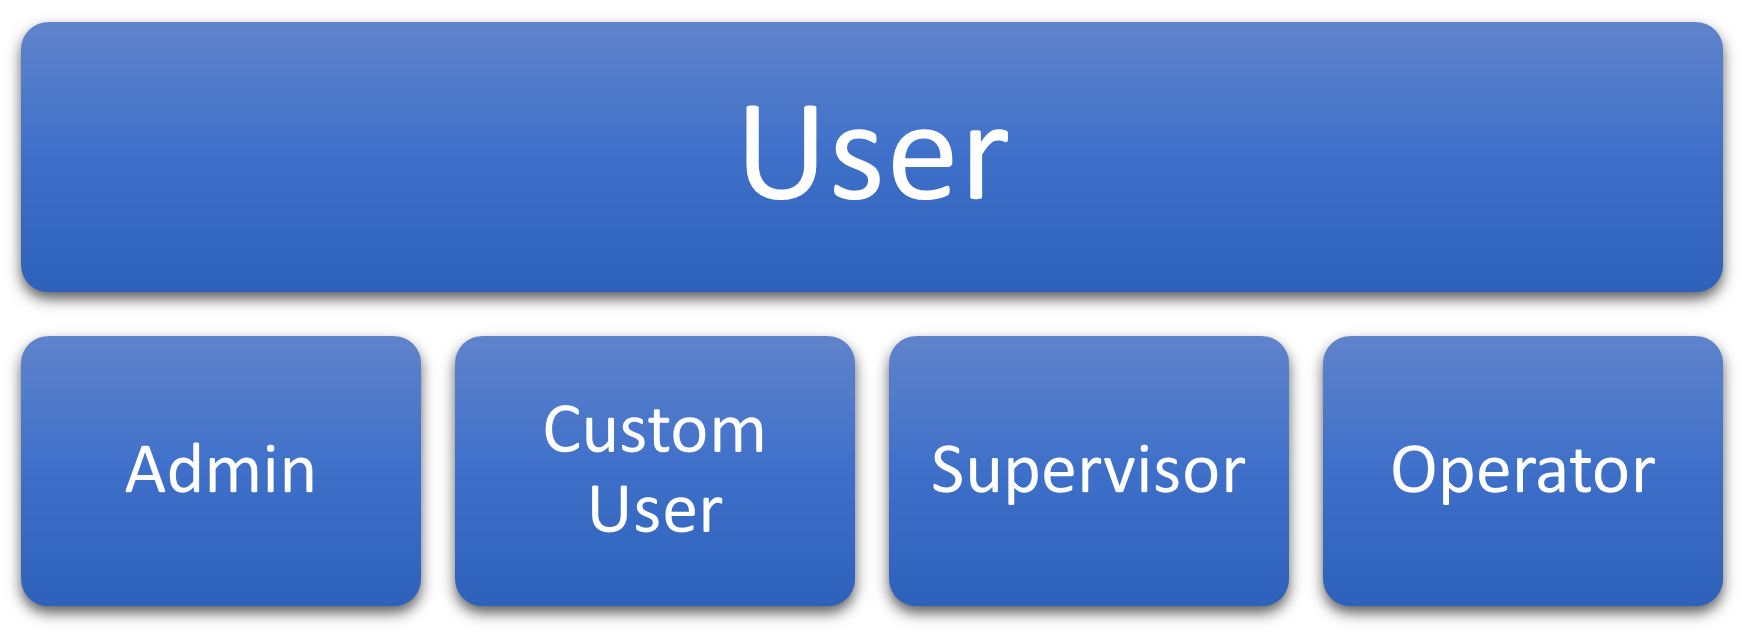
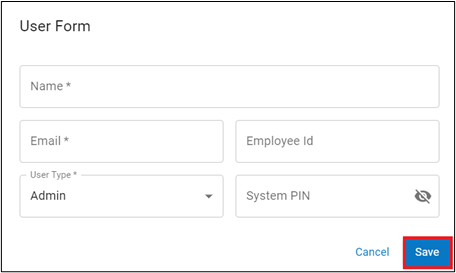
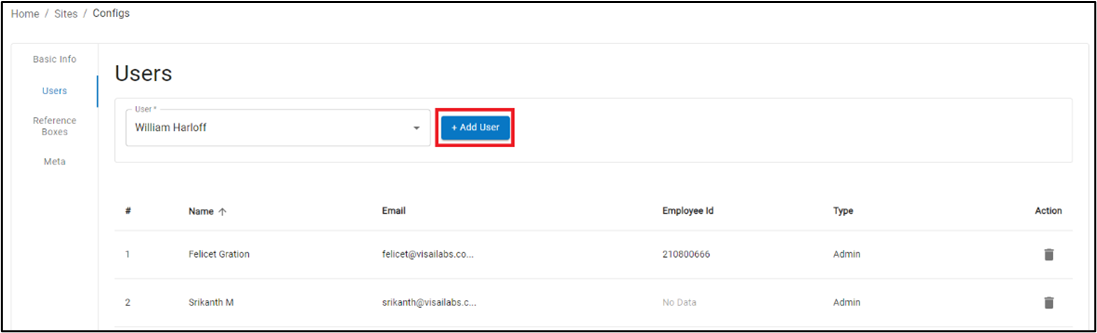
2.4 User Creation
Step 2: Click on the ‘Users’ on the left side of the screen.
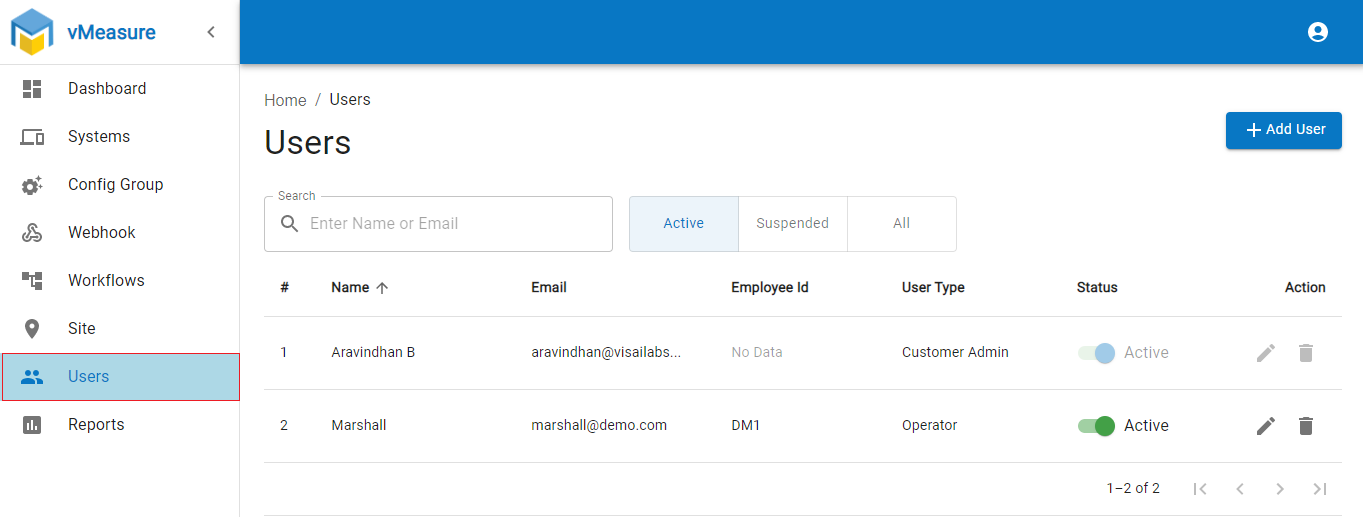
Step 4: Fill the ‘User Form.’ In the ‘User Type’ field, select the preferred user.
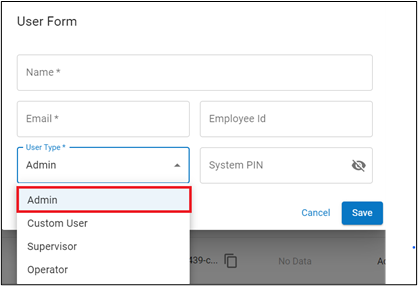
Step 5: Click the ‘Save’ user button to create a preferred user on vMeasure Forge.
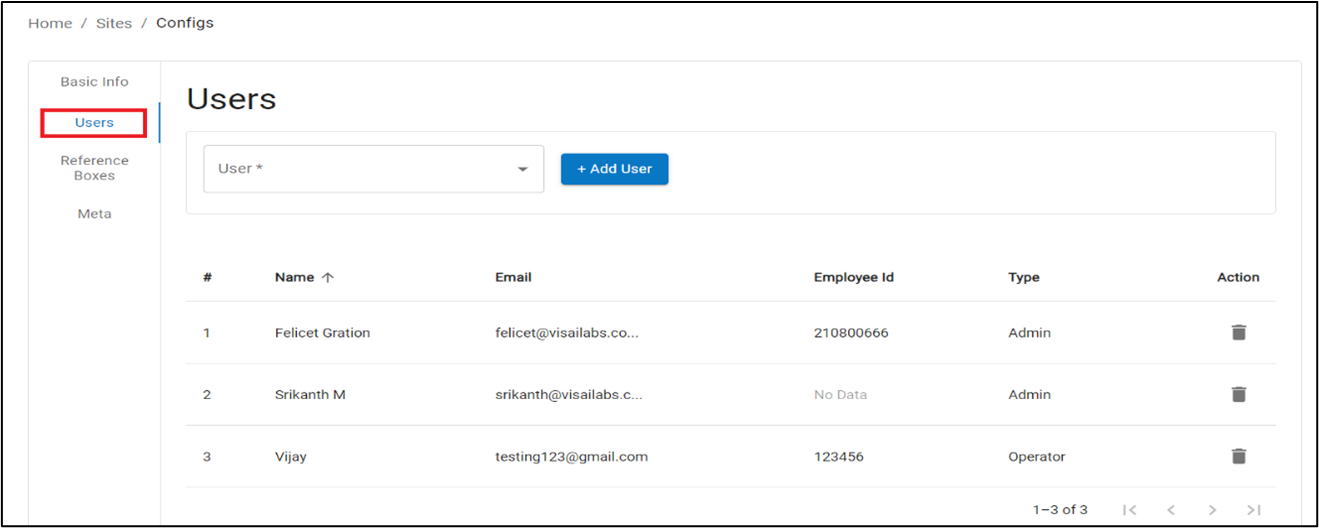
2.5 – Assign User to the site
Step 1: Navigate to the ‘Site’ menu.
Step 2: Click on the Tools Icon in the site to which you want to assign a user to.
Step 3: Step 3: Inside the ‘Site View’ tab, click on the ‘Users’ on the left side of the screen.
Creation of workflows, webhooks, file hooks, and config groups
You can have up to 10 custom workflows on the vMeasure Ultima device which can be set up via Forge. This allows the user to capture additional data than just the SKU dimensions and weights.
On the integration front, you can create webhooks to integrate the cloud server of your choice with Forge. Alternatively, you can also use the device on Slave Mode which helps you to trigger measurements from a remote system.
So, vMeasure Forge allows you to combine workflows and webhooks by putting them into a ‘config group’ and assigning that config group to a system.
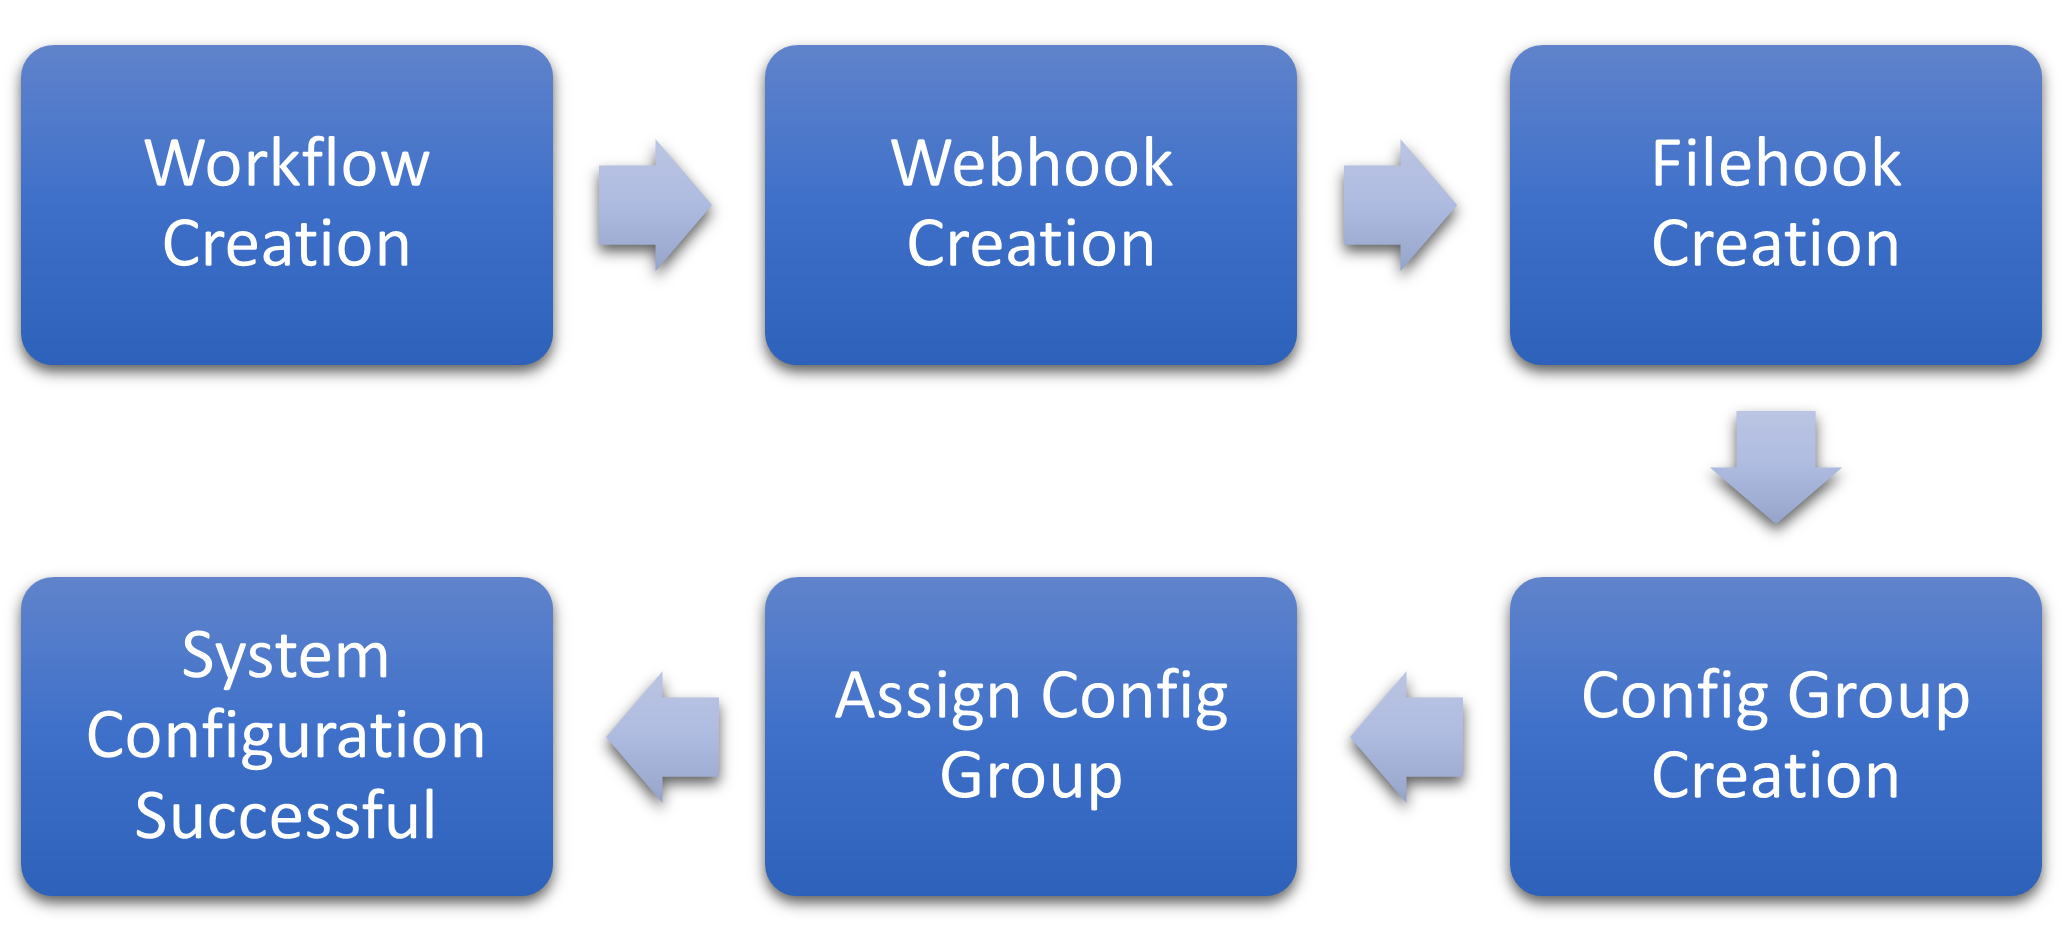
Workflow Creation – To get a custom workflow.
Webhook Creation – To hook measurement data with 3rd Party Cloud.
File hook Creation – To hook the image data to cloud storage.
Config Group Creation – To select the workflow and webhook combination.
Assign Config Group – To assign the Group to the system.
- Master Mode – The user can trigger measurements through the touch screen or any other local triggering options such as the barcode or weight sense trigger to initiate measurements. Once the measurements are done, the data will be automatically pushed to the configured webhook URL. Here, the vMeasure device is the center of all dimensioning activities.
- Slave Mode – In this mode, the vMeasure device is passive and triggered by a remote system through Rest API calls.
3.1 – Workflow Creation
3.1.1 – Workflow Creation
Step 1: Navigate to the ‘Workflows’ menu.
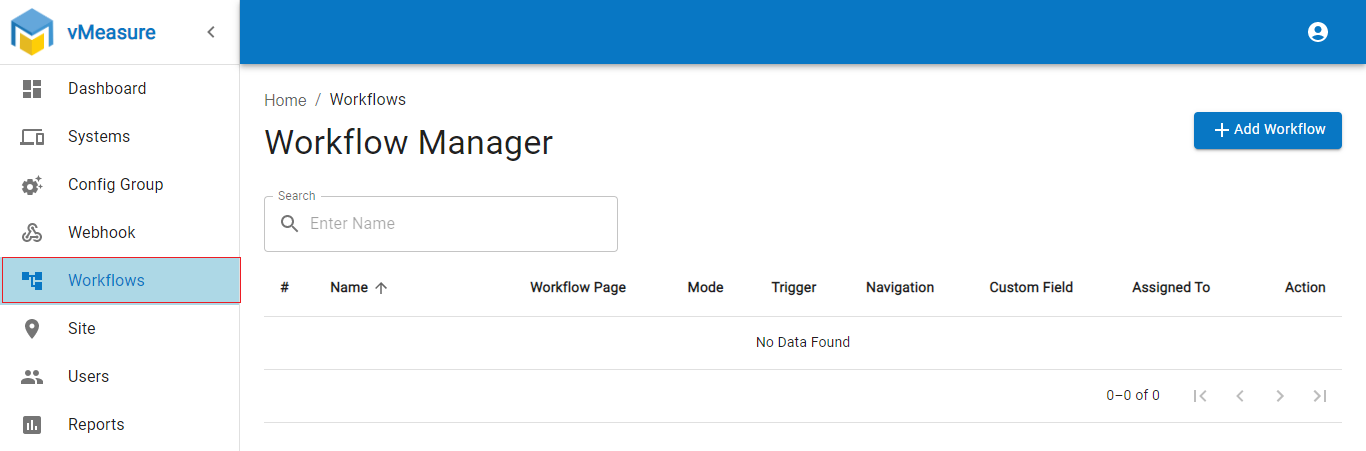
Step 2: Click on the ‘Add Workflow’ button to the right side of the screen.

3.1.1.1 – Workflow Creation – Tab 1 – Basic Settings
Step 1: Enter all the details in this Workflow form.
Note: Choose the Device Mode as either Master or Slave Mode as per your preference.
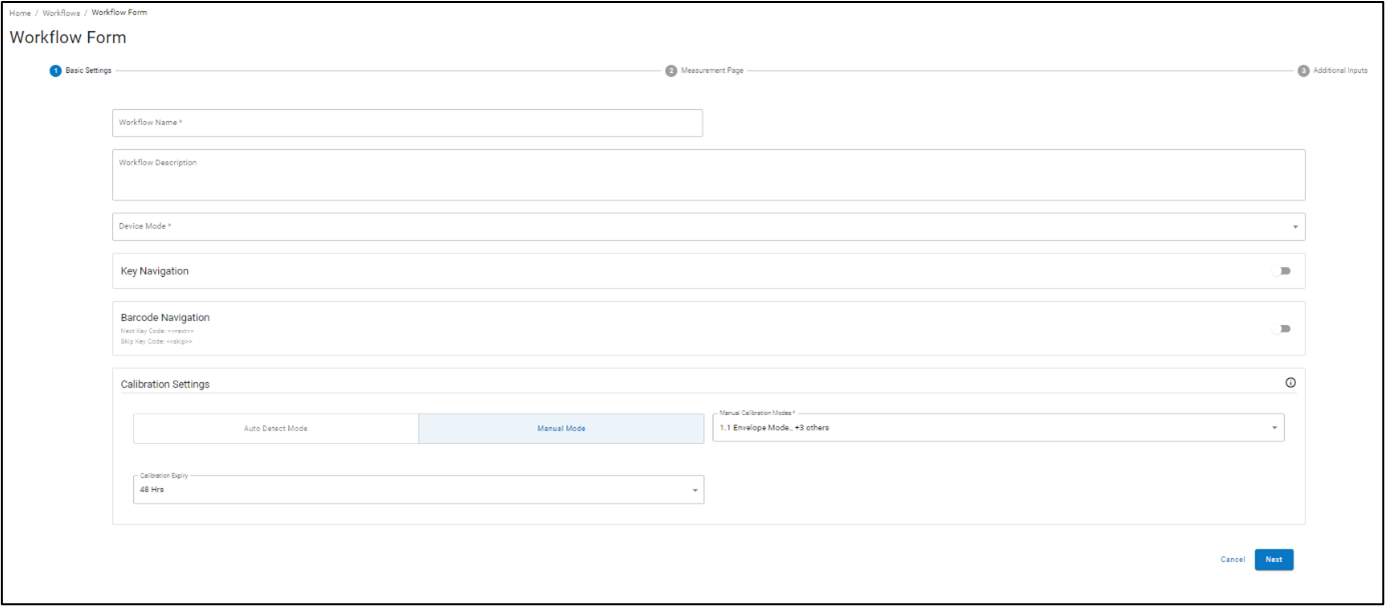
For Master Mode, you can enable the Key Navigation to configure the ‘Next Key’ and the ‘Skip Key’ using the keyboard buttons provided in the dropdown.
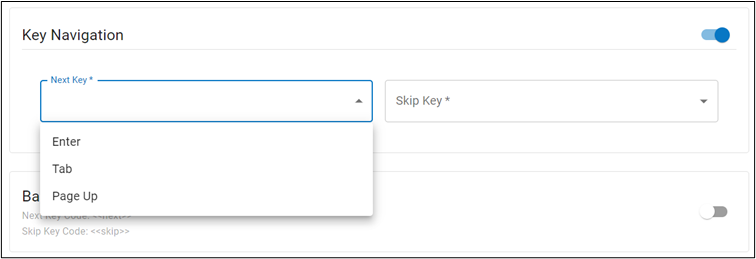
You can also use the Barcode to navigate the touch screen. For this to work, generate a Barcode for the ‘Next Key’ and ‘Skip Key’ using the key codes provided in this section.

NOTE: Key Navigation Field and Barcode Navigation Field is not available under Slave Mode.
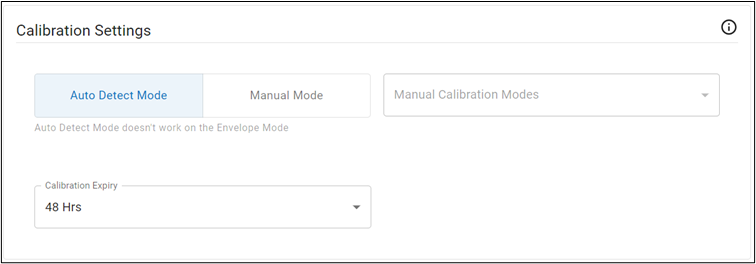
Calibration Settings: You can set the calibration either as Auto Detect Mode or Manual Mode.
- Auto Detect Mode: Automatically detects the Calibration setting.
- Note: Auto Detect Mode doesn’t work on the Envelope Mode
- Manual Mode: You can choose the preferred Calibration Modes from the dropdown.
- Calibration Expiry: You can set the validity of the calibration from 24 hours to 48 hours.
3.1.1.2 – Workflow Creation – Tab 2 – Measurement Page
In the Measurement Page, you will find the following fields highlighted in the table given below. You will also get an idea of their functionalities.

In the Measurement Page, you will find the following fields highlighted in the table given below. You will also get an idea of their functionalities.
| # | Field | Description |
|---|---|---|
|
1 |
Barcode Field |
Enabled only in Master Mode. Provide the Barcode Field Name and its minimum and maximum length |
|
2 |
Barcode Classification |
Enable this to mention the barcode classification |
|
2.1 |
RegEx |
Enter more than one Regular Expression and Classification Name |
|
2.2 |
API Validation |
Select the Classification Names and Click Configure button |
|
3 |
Additional Barcodes |
Enable to include additional barcodes |
|
4 |
Measurement Trigger |
The Trigger mode is enabled only for Master Mode and set to ‘Barcode’ by default |
|
4.1 |
Delay After Trigger |
The time delay between the barcode scan and measurement |
|
4.2 |
Weighing Scale Trigger |
This is an additional trigger option to work along with the barcode/remote trigger |
|
5 |
Smart Measurement |
This feature used to perform measurement without failure due to non-placement of object/hand over the object/person/other object closer to the object |
|
6 |
Volumetric Weight |
This section contains the Volumetric Weight configurations |
|
6.1 |
Standard / Dynamic |
You can choose either standard or dynamic. Dynamic allows you to add more than one Volumentric Divisor |
|
6.2 |
Volumetric Divisor |
This is a read-only field that displays a volumetric divisor set. |
|
7 |
Cubic Volume |
Option to enable or disable Cubic Volume of the parcel. |
|
8 |
Real Volume |
Option to enable or disable Real Volume of the parcel. |
|
9 |
Custom Field |
Option to enable or disable Custom Field of the parcel. |
|
9.1 |
Add Field |
This button allows you to add multiple Custom Fields as list, toggle or text |
|
10 |
Image Annotation |
This section contains image annotation configurations |
|
10.1 |
Date/Time |
Select check box to display date and time on the annotation on the image |
|
10.2 |
Volumetric Weight |
Select check box to display Volumetric Weight annotation on the image |
|
10.3 |
Barcode ID |
Select check box to display Barcode ID |
|
10.4 |
Cubic Volume |
Select check box to display Cubic Volume |
|
10.5 |
Enable Custom Field |
Select check box to display the Custom Field list |
|
11 |
Measurement Result |
|
|
11.1 |
Enable Result timeout |
Set the result timeout from the drop down |
|
11.2 |
Enable Measurement Reject |
This option is available only for result timeout greater than or equal to 5 sec |
|
11.3 |
Show Additional Result |
Enable or disable additional result to show Volumetric Weight, Cubic Volume or Real Volume |
|
11.4 |
Show Result Barcode |
|
|
12 |
Measurement Retry |
Enable this to set the Maximum Retry Count |
|
13 |
Upload Mode |
This mode provides the flow in which measurement data is uploaded to Forge cloud. |
|
13.1 |
Synchronous / Asynchronous |
|
|
14 |
Additional Images |
Enable Additional Images to display images captured before measurement and captured on measurement |
|
15 |
Additional Video |
Enable Additional Video to include video. Select the preferred video duration from the dropdown |
Click on the ‘Next’ button to proceed to the final step of the Workflow creation process.
3.1.1.3 – Workflow Creation – Tab 3 – Additional Inputs Page
– Check Box
– Radio Button
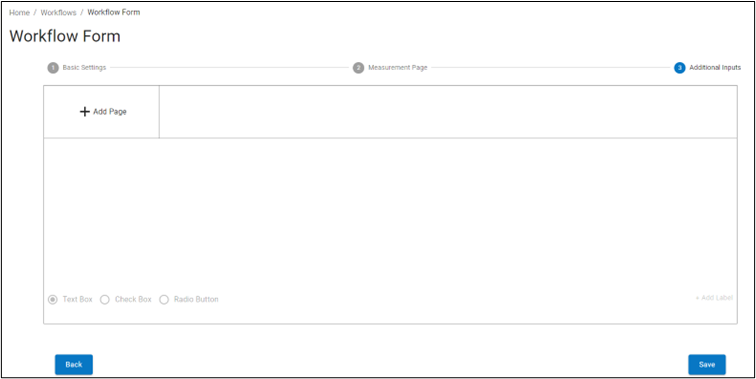
Click the ‘Save’ to finish the workflow creation.
3.2 – Webhook Creation
Step 1: After logging in to your Forge account, navigate to the ‘Webhook’ tab.
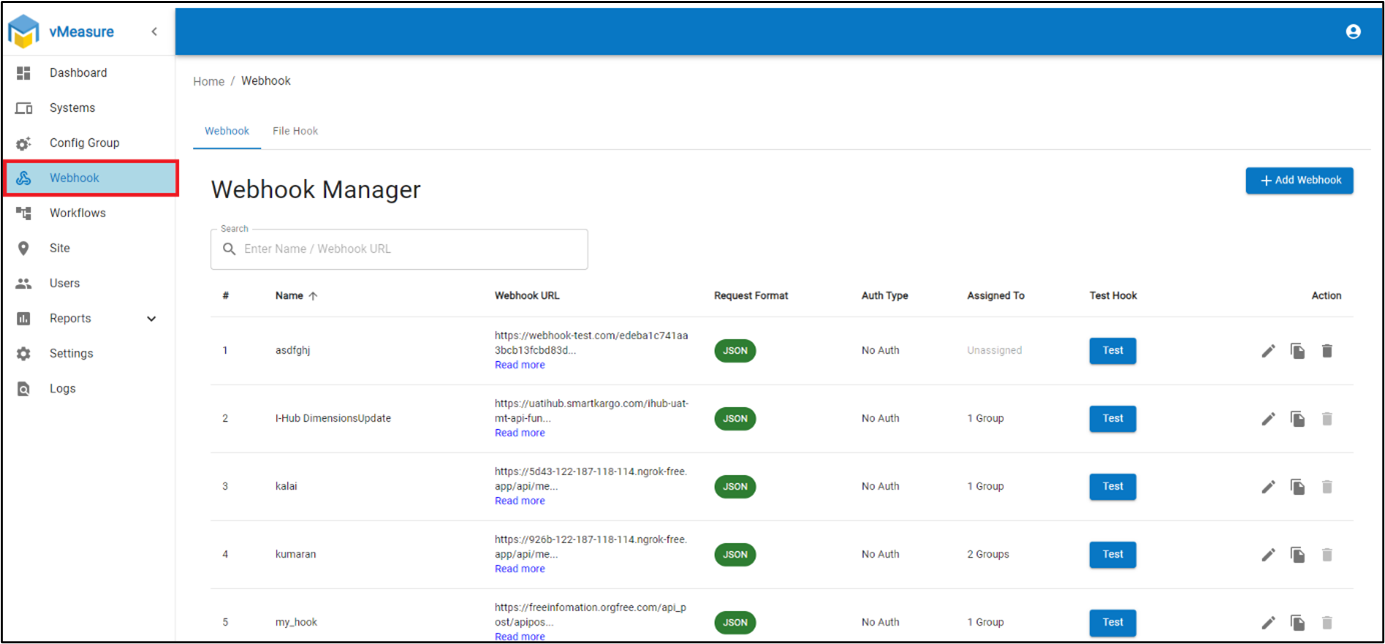
Step 2: Click on the ‘Add Webhook’ on the right side of the screen.

Step 3: Input the required details in the ‘Webhook Form’ using the instructions given below
| S.No | Field | Description |
|---|---|---|
|
1 |
Webhook Name |
Specify the name for this webhook |
|
2 |
Request Format |
You can select the request format from anyone of these two extensions: JSON or XML |
|
3 |
Measurement Status |
Set measurement Status to ALL, SUCCESS, FAILED based on your preference |
|
4 |
Method |
Choose the API method (PUT or POST) that will meet your need. |
|
5 |
Webhook URL |
Enter the webhook URL |
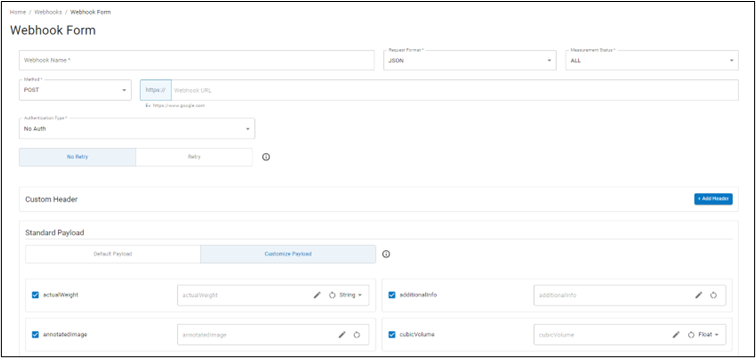
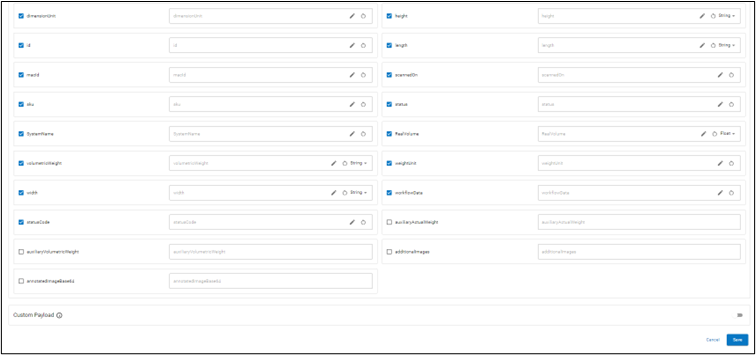
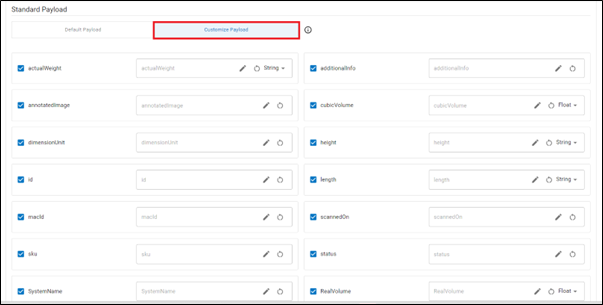
Step 4: Either choose the Default Payload or Customize Payload in the ‘Standard Payload’ section to use the existing field name or customize the payload keys containing the measurement data as shown below.
Step 5: Click on ‘Pencil’ icon to edit any fields based on your requirement and input the desired value


Step 6: Click on the ‘Save’ button to successfully create a Webhook.
3.3 – File hook Creation
Step 1: Login to your Forge account and navigate to the ‘Web Hook’ tab.
Step 2: Click on the ‘File Hook’ tab next to the ‘Webhook’ tab.
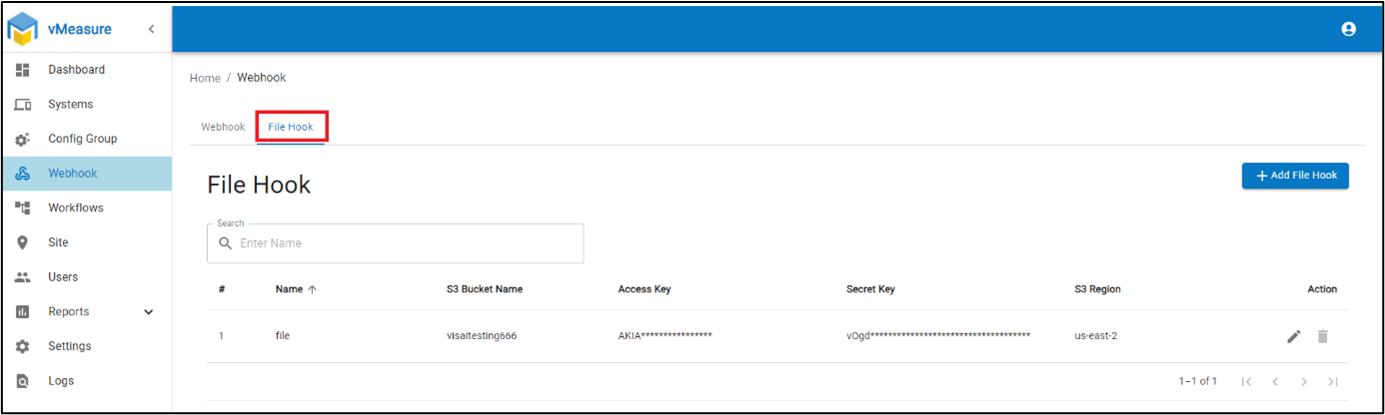
Step 3: Click the ‘Add File Hook’ button to the right side of the screen.
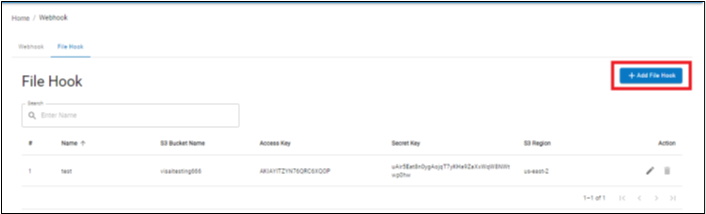
Step 4: Enter all the required details in the ‘S3 Webhook Form’

Step 5: Click on the ‘Save’ button to successfully create a File Hook.
3.4 – Config Group Creation
Step 1: Login to your Forge Account and navigate to the Config Group tab.
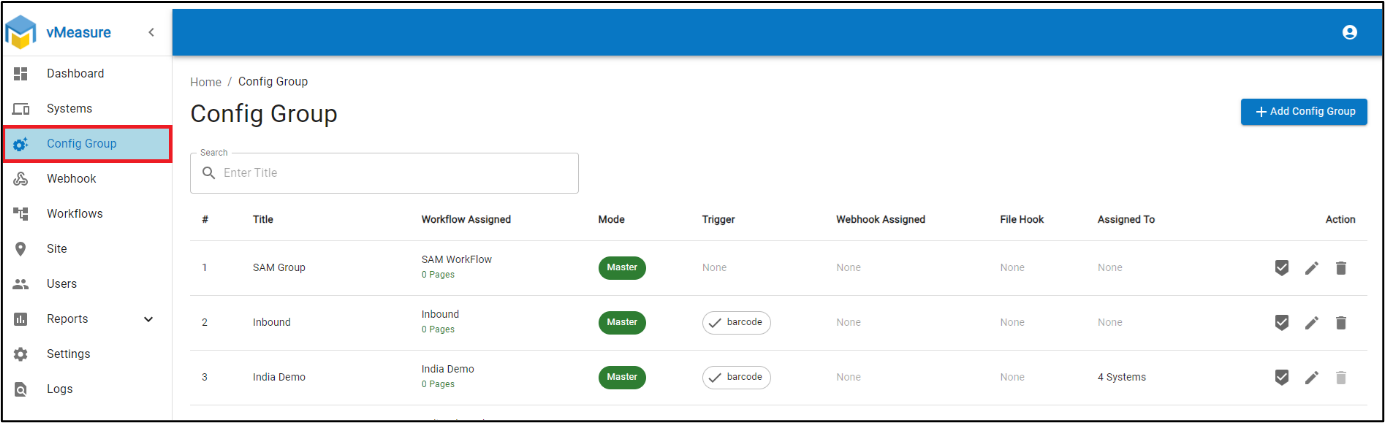
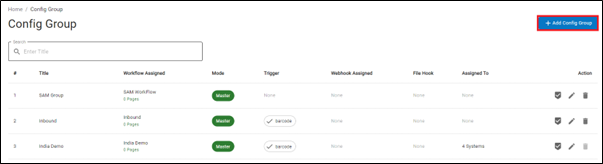
Step 2: Click on the ‘Add Config Group’ button on the right side of the screen.
Step 3: Enter all the required details in the ‘Config Group’ Form. Select the desired workflow, file hook, and webhook from the respective dropdown.
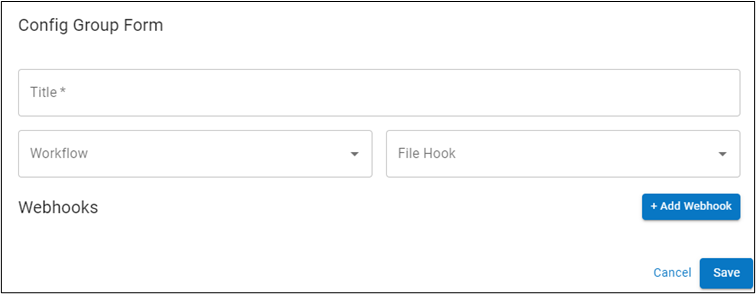
Step 3.1: You can have up to three webhook based on their Measurement Type.
- Measurement Check – To pass all measurement data done using reference box.
- Classification – To pass all measurement data based on column classification (custom fields)
- Normal – To pass all daily measurement data.
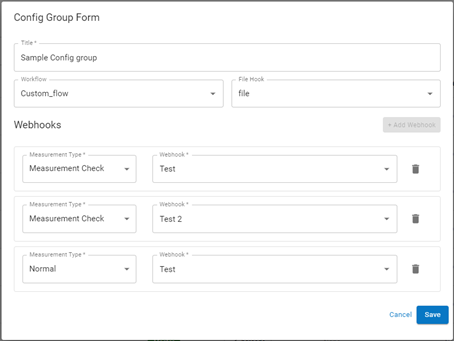
Step 4: Click on the ‘Save’ button to successfully create a Config Group.
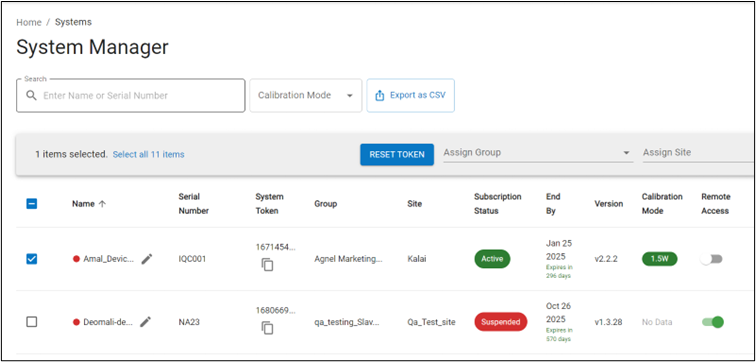
3.5 – System Configuration
Step 1: Navigate to the Systems tab on the left side of the screen.
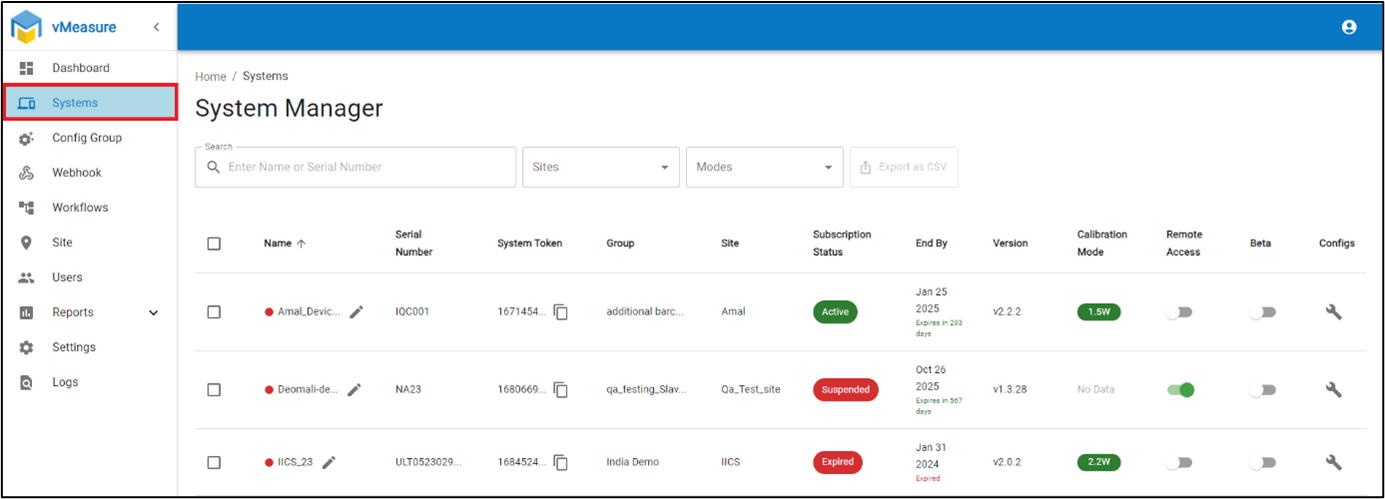
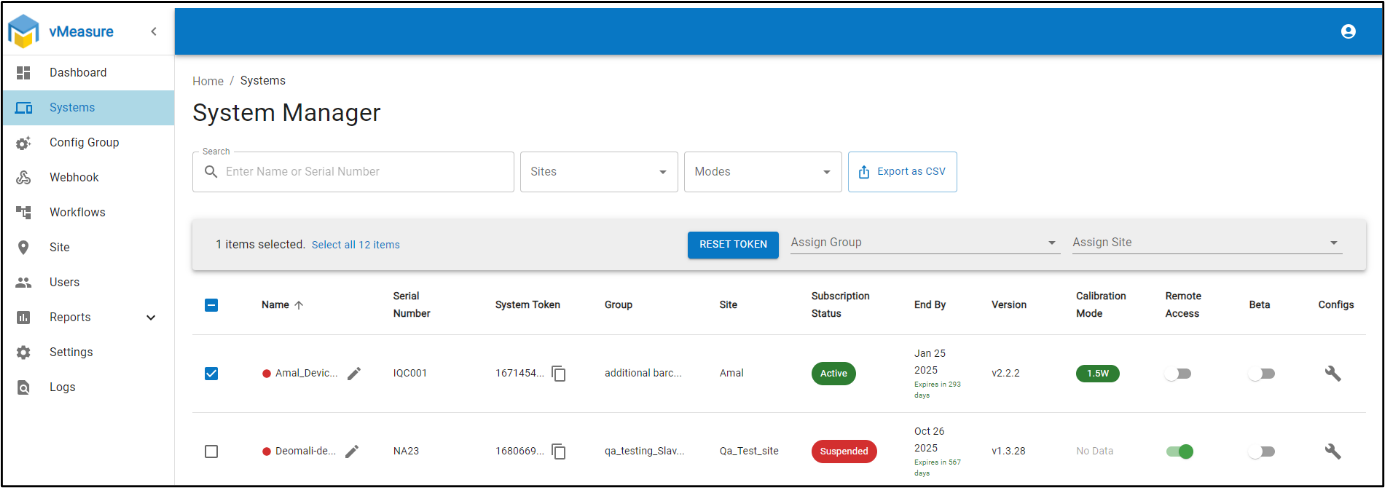
Step 3: Click on the ‘Assign Group’ dropdown and select your desired group.
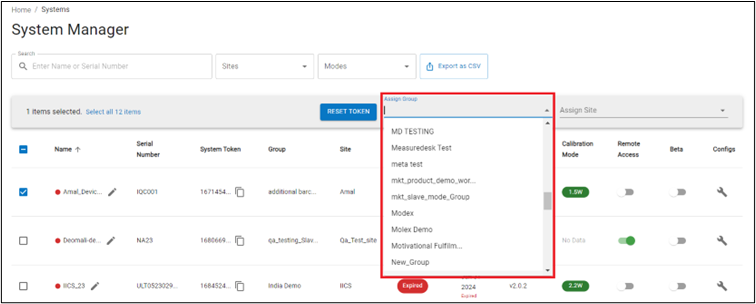
Step 4: Click on the Tick icon to confirm the selection.

Step 5: Click Yes to confirm the newly assigned config group.
Step 6: Click on the ‘Reload’ button for the System configuration to take effect.

4. Getting started with Forge APIs
You can integrate your system to the vMeasure Forge (Cloud) seamlessly with the help of APIs. Refer to the vMeasure Forge API Documentation to know more about API integrations.
The Forge APIs need systemid and the userid to validate and identify the respective system(s).
This section will show you how to retrieve the systemid and the userid from vMeasure Forge.
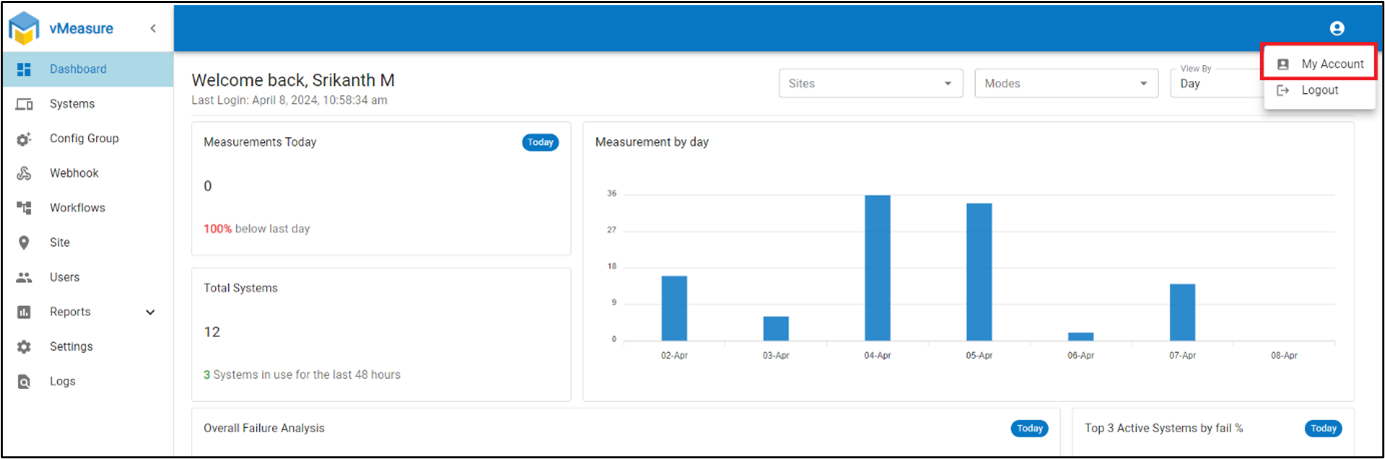
Step 1: Login to your Forge account and navigate to ‘My Account’ tab on the top right corner of the screen.
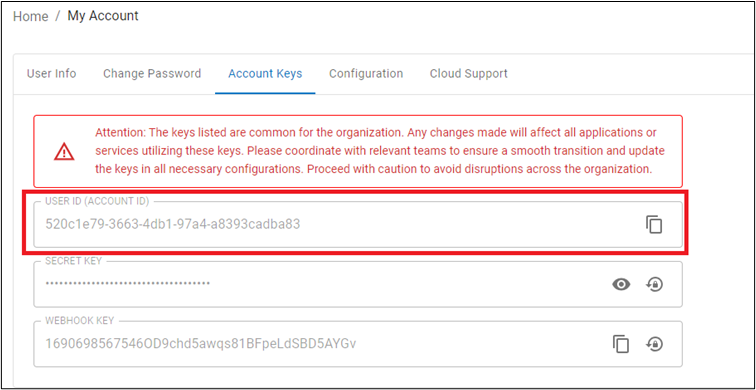
Step 2: Click on the ‘Account Keys’ tab.
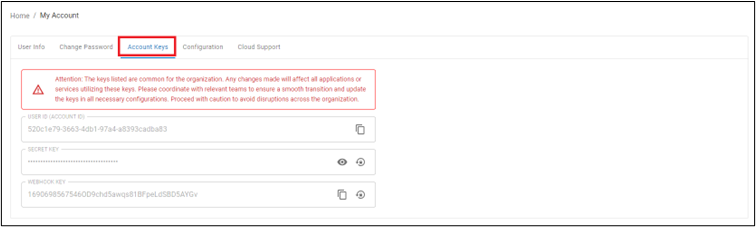
Step 3: Copy the USER ID.
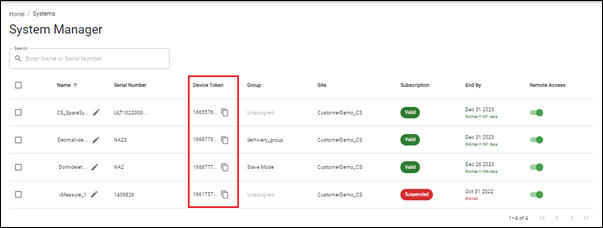
Step 4: To get the systemid, navigate to the ‘Systems’ tab.
Step 5: Identify the system to which you want the integrations to be done. Copy the ‘Device Token’ of that system.
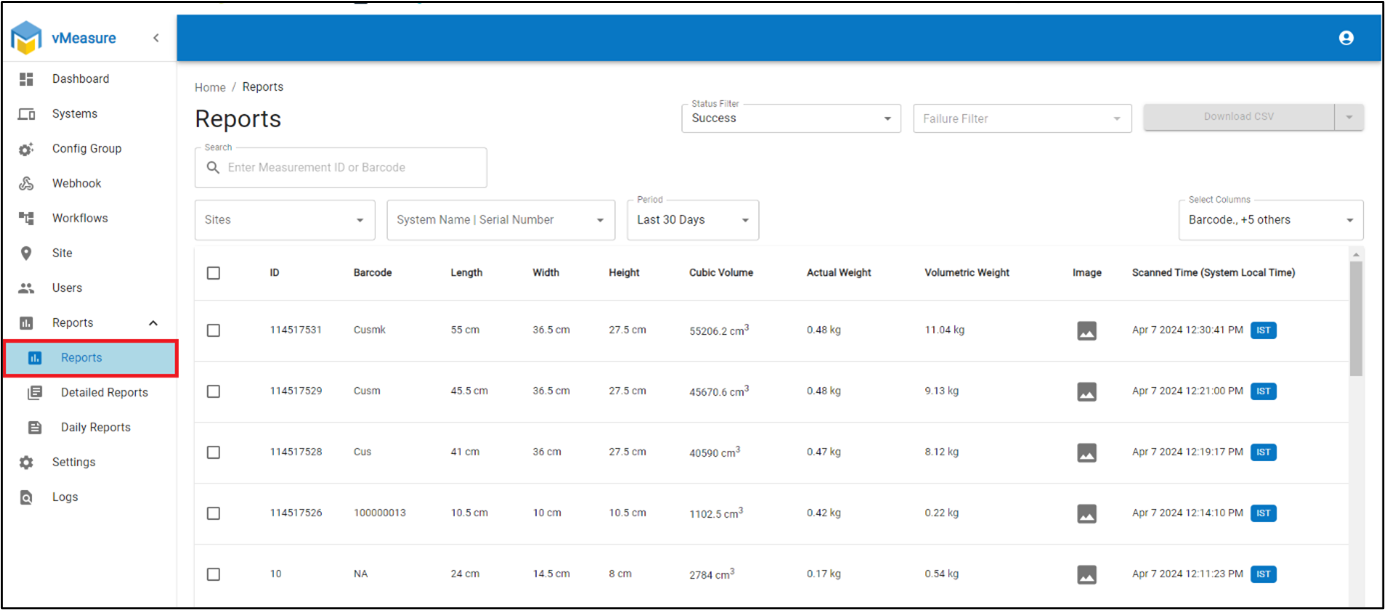
5. Reports Management
Click on the Reports dropdown tab. You can choose your preferred reports from the list of Reports.

5.1 Reports
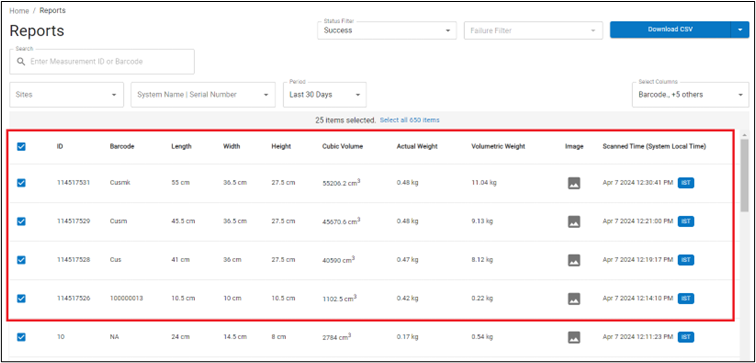
- ID
- Barcode ID
- Length, Width, Height
- Cubic Volume
- Actual Weight
- Volumetric Weight
- Image
- Artifacts (Contains Videos or additional images taken during measurement)
- Scanned Time
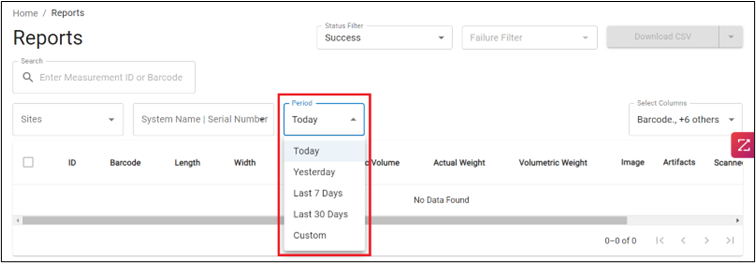
Step 1: Click on the period dropdown to download the report for up to 30 days.
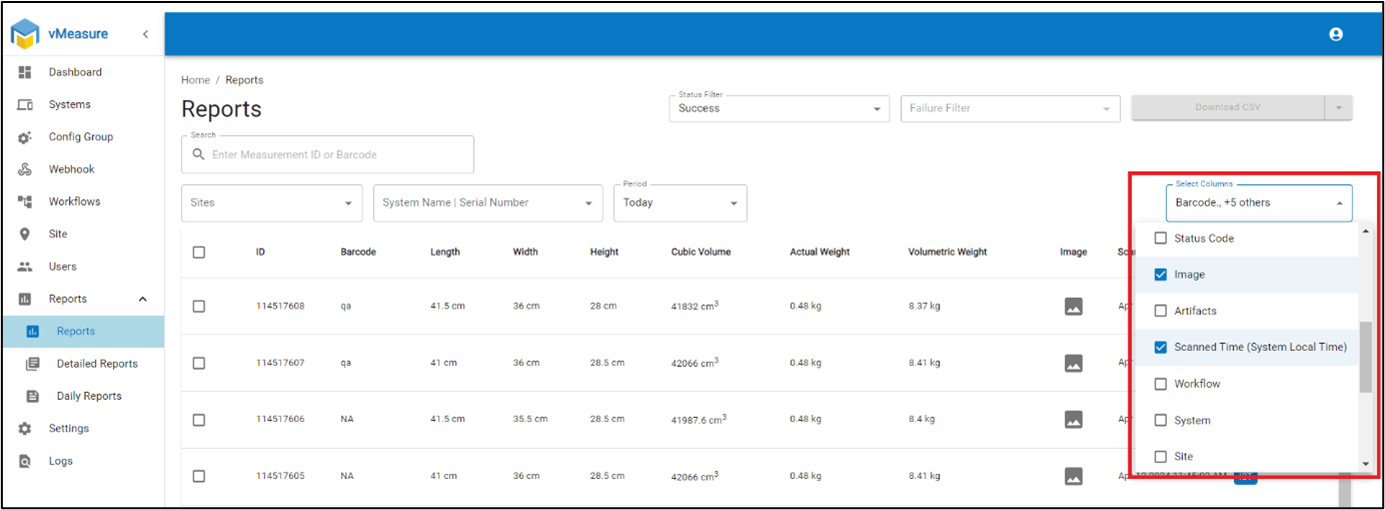
Step 2: You can use the Select Columns option to select the list of columns you wish to display in your report
Step 3: You can click on the check box to select one or more measurements you wish to download to your system.
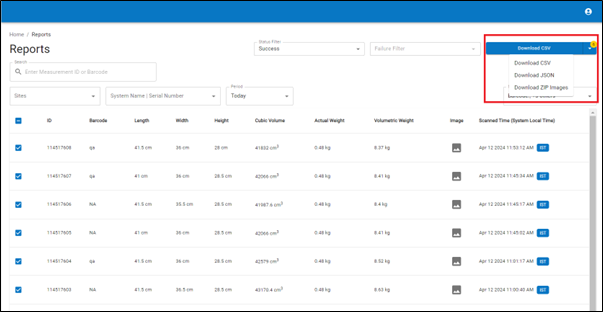
Step 4: You can download the data in three different formats:
- CSV
- JSON
- ZIP containing all images
Choose your desired format and click the ‘Download’ button to begin download.
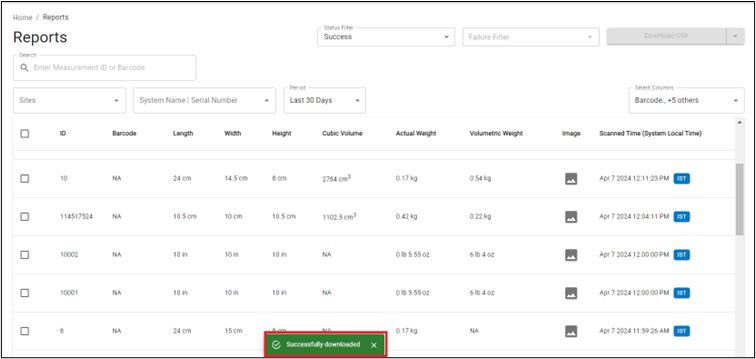
Step 5: The file is now downloaded to your system.
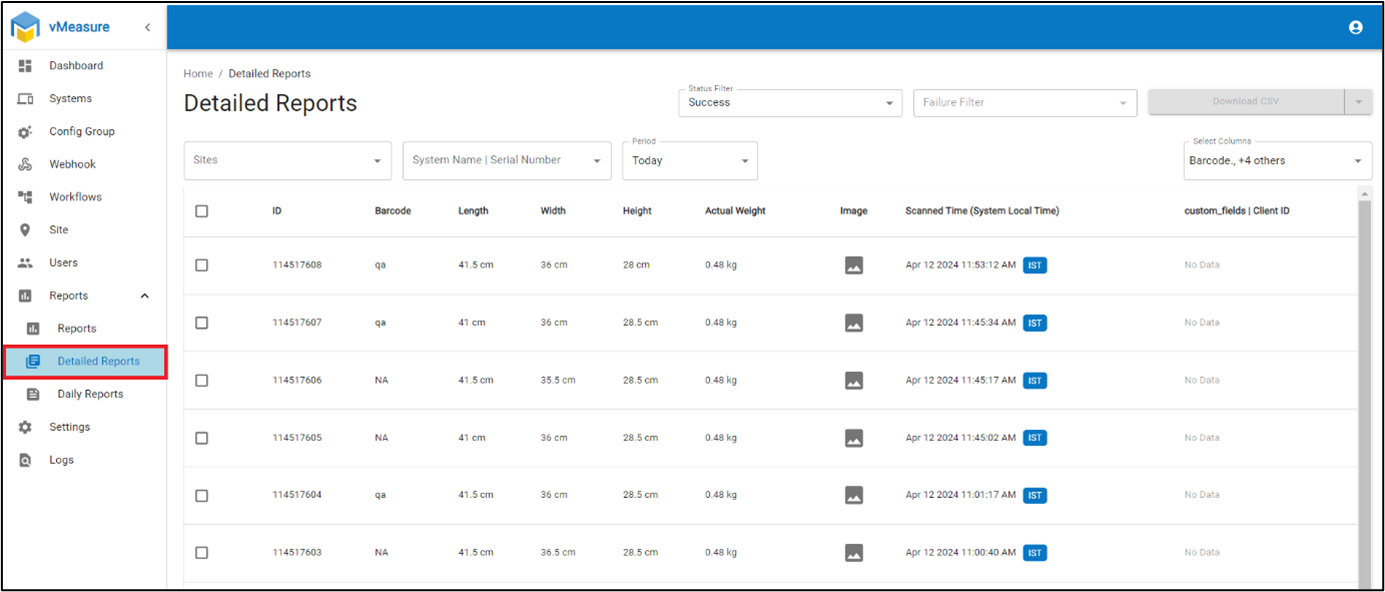
5.2 Detailed Report
Similarly, you can also utilize the functionality of the Detailed Report to download a report for the past 7 days
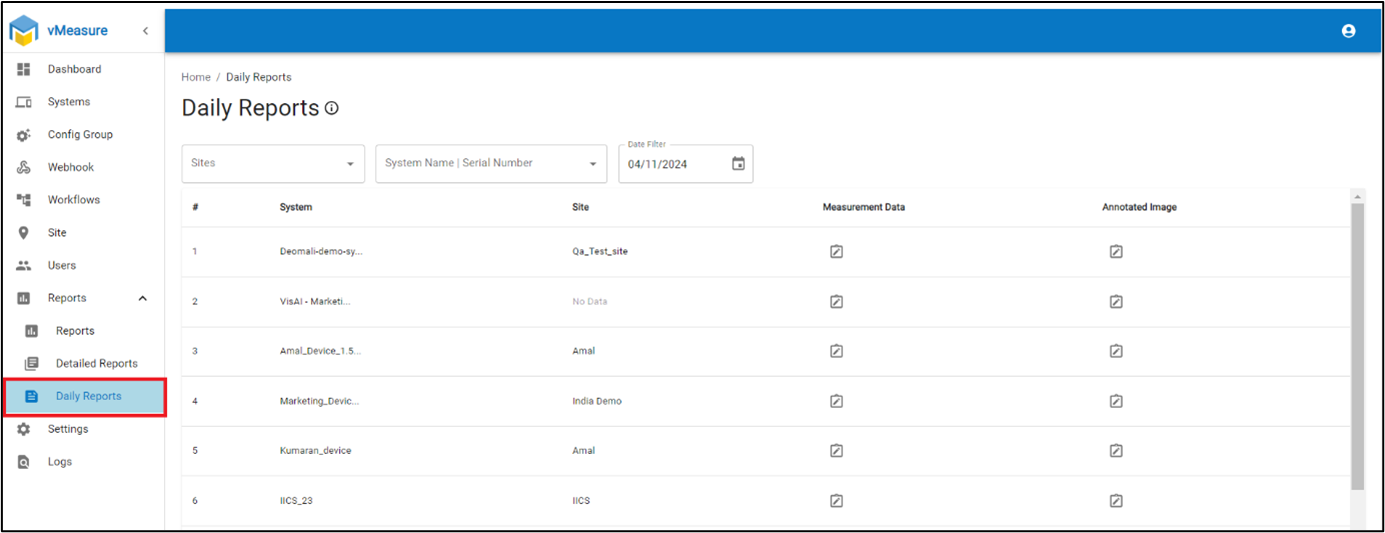
5.3 Daily Reports
Use Daily Reports to download a report for one day.
6. Support
- The name of the product
- The serial number of the product
- The short description of the issue
- The peripherals connected to the system for answering your questions
Contact us,